
OneLogin is an Identity and Access Management (IAM) system, allowing you to perform Single Sign-On for all your web and mobile applications. The service offers a full-featured federation engine and a flexible access policy. A user can log in with a single ID to gain access to connected systems without being prompted to enter different usernames or passwords.
To learn more about SSO, see Understanding Single Sign-On.
This article covers two setups:
- Configuration in OneLogin
- Configuration in VIDIZMO
Configuration in OneLogin
These instructions will allow Manager or Administrator of the Portal to allow users to access their Portal using OneLogin credentials.
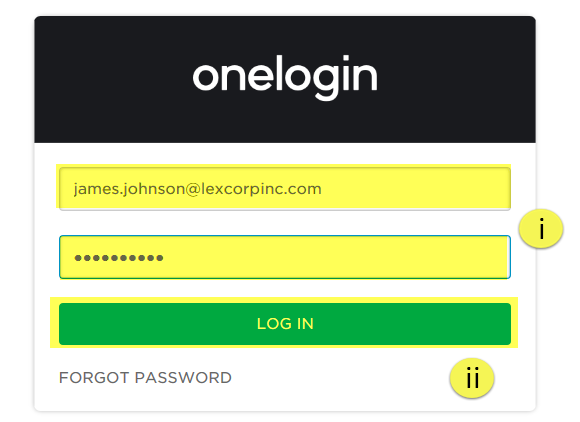
1. Go to www.onelogin.com and select LOG IN.
![]()
2. From the login screen:
i. Enter your email address and password.
ii. Then select the LOG IN button to proceed.
3. After successfully logging in, you need to copy the URL on the address bar which shall be something similar to https://[your-onelogin-app-name].onelogin.com/home. You need to copy the part of the URL before home, and append /oidc to it. The final URL will look something like: https://[your-onelogin-app-name].onelogin.com/oidc. This URL will be later needed as Authority URL when configuring app in VIDIZMO Portal.
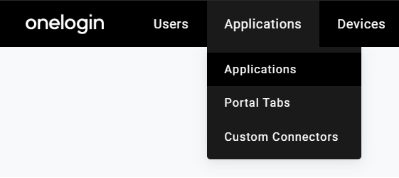
4. From the top menu bar navigation,
i. Hover on Applications.
ii. Select Applications from the dropdown menu.
5. On the Company Apps screen, select the ADD APP button.

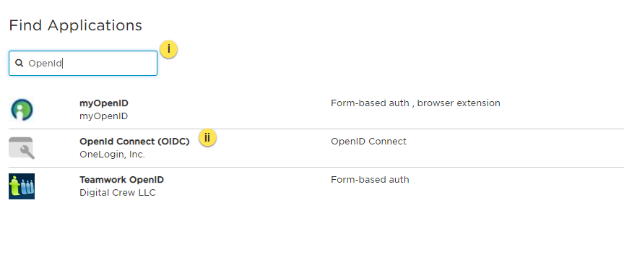
6. You will be redirected to the Find Applications screen:
i. In the search box, type the keyword OpenIdConnect to list all OpenIdConnect related applications.
ii. From the list of search results, select OpenId Connect (OIDC).
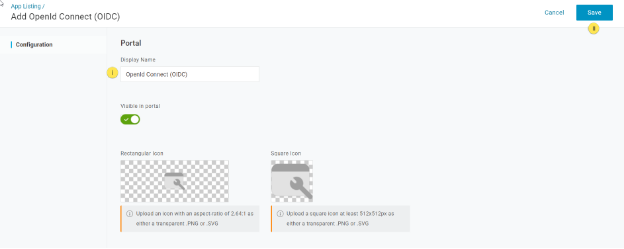
7. Selecting the OpenID Connect (OIDC) opens up its Info screen:
i. Enter a Display Name for your application in OneLogin.
ii. Then select the Save button to add the application.
NOTE: To upload an icon for your APP, select from either the rectangle or the square, depending upon the shape of your icon.
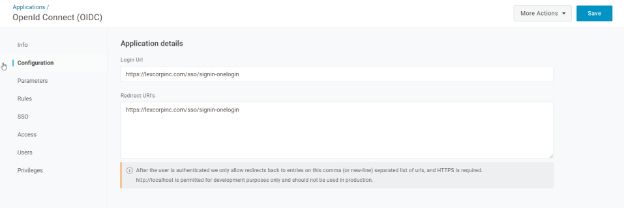
8. The next tab is the Configuration tab where you are required to list the Redirect URL. This is your Portal URL with /sso/signin-onelogin appended at the end.
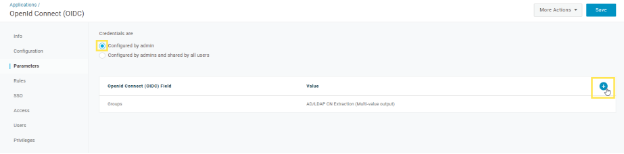
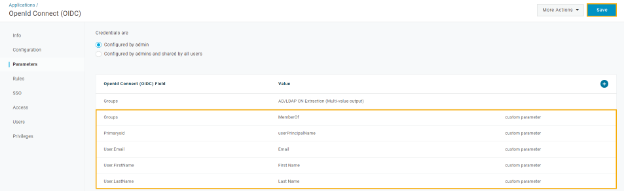
9. To map user data with VIDIZMO, some new parameters need to be defined in OneLogin. To do this, select the Parameters tab.
i. Select the radio button Configured by admin.
ii. Then select the Add parameter link to start adding parameters to map with your application.
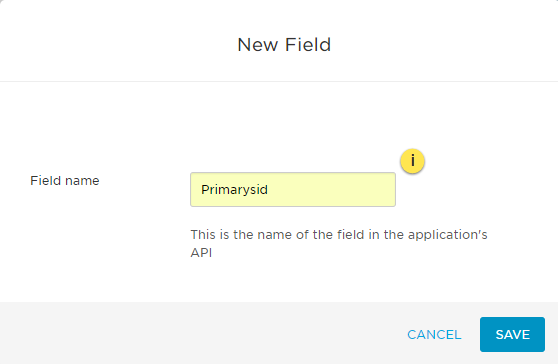
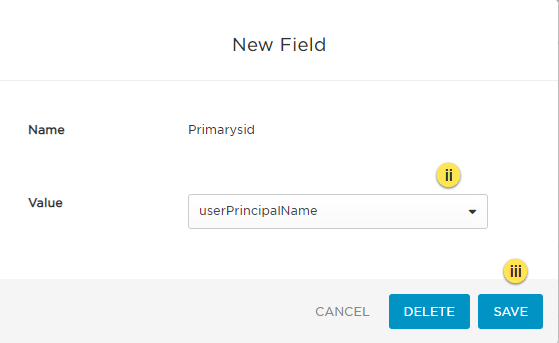
10. A New Field popup window will appear:
i. Enter the Field name of the parameter.
ii. As soon as you add a Field name, the Value field appears where you can select the available options from the dropdown list to map with the Field Name.
iii. Then select the Save button to proceed to add the parameter.
11. The new parameter gets added successfully and shows up in the table with the rest of the parameters.
12. Repeat the steps above to add the following parameters and their values for OneLogin and your application to communicate successfully:
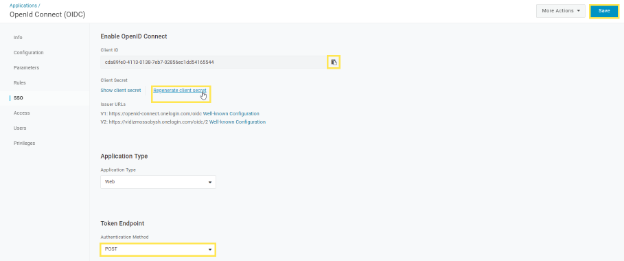
13. Once the parameters have been defined, select the SSO tab. You will need the Client ID and the Client Secret when configuring SSO in your VIDIZMO Portal.
i. The Client ID gets generated automatically at this stage. Copy it using the clipboard icon against the ID.
ii. Select Regenerate Client Secret to generate the client secret and then copy it for later use.
iii. Make sure to select the Authentication Method as POST from the drop-down menu.
iv. Select Save to complete configuring your app. Now you will be required to register this app in your VIDIZMO Portal.
Configuration in VIDIZMO
1. In VIDIZMO, select the menu icon in the top-left corner to open the navigation pane. 2. Expand the Admin section and select Portal Settings. 3. Go to Apps > Single Sign-On. 4. Select the settings icon on the OneLogin app. 5. In the settings dialog, enter the following:
- Client ID The unique identifier for the client application that you copied in the step above.
- Client Secret The client secret is used in conjunction with Client ID to authenticate the client application. It is the same attribute you copied in the step above.
- Authority The OIDC application homepage URL that you copied from the address bar in the step above.
- SSO Login Message A custom message displayed on the sign-in page for this SSO option. This is particularly useful when you have configured various SSO providers for different users and groups.
- SSO Login Button Label A custom label for the OneLogin sign-in button on the sign-in page.
- Force Login Select this option to redirect users directly to the OneLogin sign-in page. When unchecked, users sign in through your Portal's sign-in screen.
- Requires HTTPS Metadata Select this checkbox to ensure HTTPS is required to get the metadata. When the request is handled for the first time, it tries to retrieve metadata from the authorization server. This metadata, or discovery document in OpenID Connect terminology, contains the public keys and other details needed to validate tokens.
- Callback Path Pre-configured to
/sso/signin-onelogin. This needs to be appended with the portal's URL when specifying Redirect URI in OneLogin App configuration. - Scope A space-delimited list of scopes. OpenID Connect uses scope values to specify what access privileges are being requested for access tokens. The scopes associated with access tokens determine which claims are available when they are used to access the OIDC /userinfo endpoint. The following scopes are supported: openid, profile, email, phone, groups etc.
- Response Type Specifies the response type for OIDC authentication. Any combination of code, token, and id_token is used and is an opaque value that can be used to redeem tokens from the token endpoint. In our example, we have used "code" type. The code is returned if the response_type includes code. The code has a lifetime of 60 seconds.
- Save Tokens Select to save tokens. You will need administrator privileges to save. API tokens have the same permissions as the user who creates them, and if the user permissions change, the API token permissions will also change.
- Get Claims From UserInfo Endpoint Selecting this option returns claims about the authenticated end user if the UserInfo endpoint claims need to be obtained implicitly.
- Attribute Mapping Attribute Mapping allows you to map your attributes with the IDP's attributes.
- CAL Select a Client Access License to assign to users who sign in through OneLogin SSO. When a user enters the Portal via OneLogin SSO, this CAL is assigned to them, granting the permissions associated with that CAL.
6. Select Save Changes to apply your settings. 7. Turn on the toggle for the OneLogin app to enable SSO.
NOTE: A notification will appear stating "Portal Information Updated Successfully."
Result
Navigate to the Portal's sign-in screen and you will see an option to Log In with OneLogin. To learn further about signing in, read Sign in using OneLogin.